Before you submit your claims, make sure you know and have on hand the following:
Step 1 - Create a Claim Report
Step 2 - Add Claims
Step 3 - Submit for approvals
- Original receipts
- Information to put on forms and supporting documents
- Reports are submitted within a specific period which is set by your company
- Approvals are required before your claims can be reimbursed
Step 1 - Create a Claim Report
To create a claim report, follow these sub steps:
Step 1 - Click on the create report
Step 2- Enter the report title (example: January Claims)
Step 3 - Select the date range of the report submission
Step 2 - Add Claims
Click Add Claim to begin.
You can add up to 10 attachments per claim. This feature is available in Swingvy mobile app as well.
Note:
- You can add up to 10 files (Max 10 MB for each)
- For iPhone users, kindly disable live photo feature before you snap your claims receipts
Step 3 - Submit for approvals
Once you are done with all the claim items, don't forget to submit for approval.
The claims status will show pending after you submit it and it will only change to approved once the approver has approved the claims.
Note:
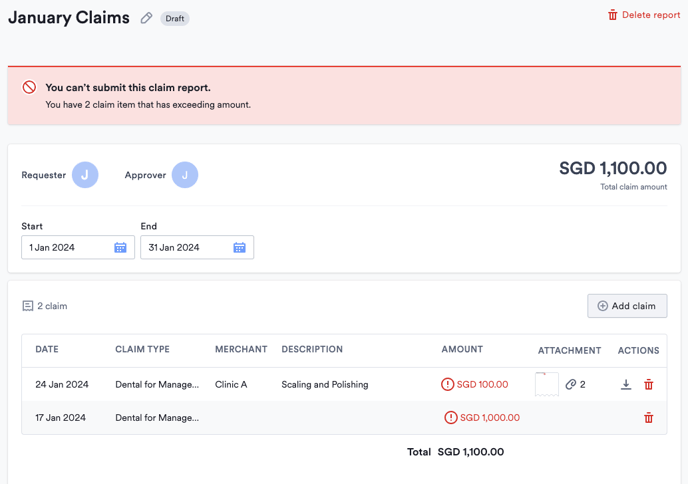
If your admin has set an annual limit on your claim item, you will not be able to proceed with submissions if the total claim amount for the claim item exceeds your assigned annual limit. For example:-
- The annual limit set by your admin for the claim type is $1000
- You created two claim items in the same report:
- Claim 1 amount: $100
- Claim 2 amount: $1000
- You will only be able to proceed with submissions if your claim is lower/equal to your annual claim limit balance
Upon receiving approvals for the submitted claims, you may choose to download a PDF copy of your submissions