Upload payroll history data
If you are migrating to the Swingvy platform from other systems (manual or other payroll systems), you will be required to import the previous months' payroll history before starting your next payroll.
Note:
- The payroll history will be used in your monthly tax computation also the year-end payroll reports, e.g. EA form and Form E.
- CB calculation on average is subject to an employee who earns above RM34,000 per year (after EPF deductions) or RM2,833. 33 per month (after EPF deductions).
- Failure to update your Payroll History data might affect your PCB Calculation.
- Swingvy is providing the payroll history import template, the template is available to download from the payroll setting menu. Once you've filled up the payroll history in the Excel template, you may upload it into Swingvy history database.
Follow these steps to start migrating your previous Payroll History Data into Swingvy:
- Go to "Settings" and click "Company Details"
- Scroll down until you see "Payroll History Bulk Upload"
- Select "year" and download the spreadsheet by clicking "Download"

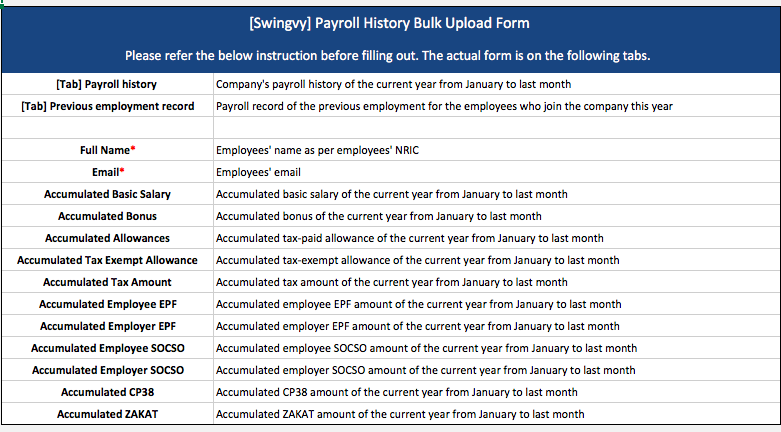
In the spreadsheet, you can enter all information through the payroll history tab. All the employee records will be exported with the name and email address.
Refer to the below instructions before filling it out. The actual form is on the following tabs:

4. On the next tab, you will see two pages of different data that you would need to provide

i. Payroll History
The payroll history tab is for the previous months payroll of the company. However, should the migration of the payroll system happen at the start of the year, no payroll history needs to be uploaded. The data from payroll history will be accumulated for the EA form and also for the accurate statutory deduction.
ii. Previous employment record
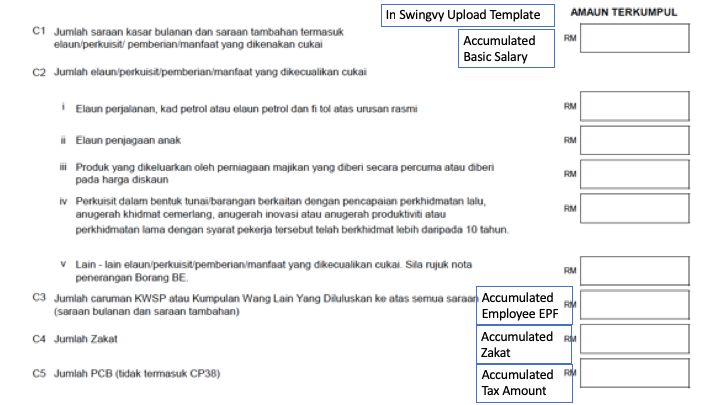
Previous employment record is used for the new employee who joins the company mid-year. The information recorded in TP3 form is to be updated in this sheet. The information uploaded in the previous employment record sheet will not be accumulated in the EA form, it is needed only for accurate statutory calculation.
Note:
TP3 is a form for the newly joined employee in the company to be filled for the record of their current year past payroll from the previous company
Enter the TP3 amount below in Swingvy history upload template in the respective column:

5. Make sure to click on "Save" to update the information accurately
6. Click "Upload" and click "Validate & Import"
7. Upon successful completion of the upload process, you will receive a confirmation message indicating that the upload was successful

Note:
-
In the situation, you uploaded your file but there is an error message prompt out, most likely it is because of incomplete data. Kindly check the column we have highlighted in the error message.
-
If you are required to make an amendment to the payroll history data after uploading the file, you may override the amount in the file and then re-upload it. Once the file with the correct amount is uploaded, please revert the payroll to step 1 to reflect the correct amount.